


Party Recap
As a toddler, my daughter would spend hours painting and drawing (at that point more splashes and scribbles, ofcourse). She loved being surrounded by her crayons and paints and still does. A lot of her interests have changed over time but if there is one thing that has been a constant all these years, is her love for art. Our walls and her journals are full of her art. As much she enjoys expressing herself through her paintbrush, she loves reading up about different artists and their lives, seeing their work at museums and wants to see her work in a museum one day! The sketchbook has always been her best friend. So, to celebrate our young artist and to celebrate art and creativity, we had an art party for her very special double-digit birthday.
Since this was going to be a group of slightly older kids, with some kind of an exposure to different artists, their work, different mediums and styles (both at home and at school), I intentionally kept away from a typically colourful painting kind of an art party (which is a LOT of fun but I feel more suited for younger kids plus I was itching to do something different) and tried to incorporate activities that children with a growing passion for art, would both enjoy and learn from.
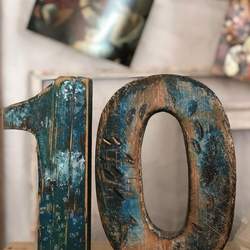
It all began with this set of wooden numbers that I had bought to mark our tenth anniversary. And the fact that two of her current favourite colours are teal and deep red (there was lots of red last year for her Harry Potter themed birthday) just sealed it for us. I decided to incorporate both the numbers and the colours across all the elements of her art themed birthday party.
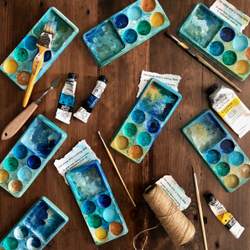
I had been toying with the idea of using mini canvasses for the invitations but these disposable white palettes were difficult to ignore A coat of gesso made it paint friendly and lots of teal, mustard, green paint later, the invitations were ready. I added a personalized note and a bit of jute twine to complete it.
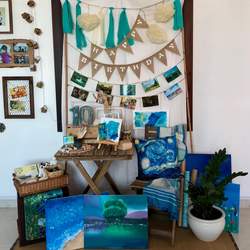
For the party, I cleared a part of our living room, added a cream coloured sheet (to make a backdrop) and brought in a chair and a table from outdoors. Since she has a cupboard full of art supplies, those made for perfect party decor. I also used some of her art (chose the ones that were primarily blue to match the theme). Added teal and cream tassels (made out of crepe paper rolls), cream paper flowers (from her beach birthday two years back) and this jute happy birthday banner that we use every year.
Next, I printed some of her favourite art to make “an art gallery”. I used jute string, wooden pegs to make the “gallery”. The Metropolitan Museum of Art has lots of art available under its “open access” category that one can download in high resolution (perfect for printing for personal use) and it’s for free. I printed all the art from there in postcard size. After the party, we used those postcards and made a calendar for her room. Now, she has a new piece of art to adore and learn more about each month.
For the rest of the décor, we used the digit 10, her artist’s mannequin, a Van Gogh inspired cushion, a Monet inspired runner (both gifts from loved ones), an alphabet stamp set, a wooden crate I had been saving for her party, my blue scarf, distressed photo frames (made from old frames many years back and also used at her picnic theme birthday, the same one where I emptied all of her room and carried it to the park ), two different kinds of blue coffee mugs to hold the pencils and brushes and random stuff like a wicker basket, paper rolls, a green plant, etc.
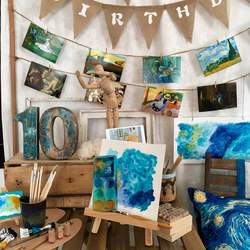
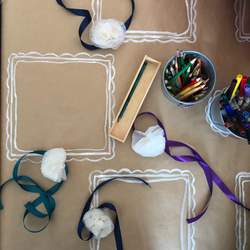
Since most of the activities in the party needed the children to both sit and use a table, I used one of our low beds sans the mattress and covered it with brown paper (butcher paper) and made a “tablecloth” out it. I painted square white frames for placemats and some more circular and rectangular frames to “frame” other supplies we needed for the activities. The children were happy to have marked places and I was happy because later this “art table” doubled up for serving food as well. No cleaning up to do. I put rugs and blue sheets all around the “table” for them to sit comfortably. Am I not the queen of shopping inside one’s home?
We had a mix of activities all inspired by some of Sara’ favourite artists and the principles of art in general.
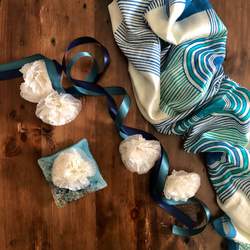
We began the day by making Frida inspired headbands. Frida is one of Sara’s favourite artist and she is always trying to master her portraits and read as much as possible on her (The book “Lucky Broken Girl”, though is not about Frida but the protagonist’s life is much like Frida’s and Sara loves that book). Frida loved wearing flowers and we made ours using several delicate white cupcake liners. 6 cupcake liners per flower, ribbon for the band, stapler pins and glue was all that we needed to make it. Some of them even turned them into brooches for their mums and some wore them around their neck like a collar.
Next up, was an activity that Sara had once done at an art camp and had enjoyed immensely.
Roll a “name of the artist”. We “Rolled a Marc Chagall”. The game is really simple; the kids roll the die and follow the instructions against each number. It allows kids to appreciate and notice some of the elements that a particular artist used more of, in her/his art. It also allows them to get over the fear of spoiling a pristine white page without being too hard on themselves (making it time bound, no erasing allowed and the prompts, all helps in reducing the fear of being perfect) and that kind of also helps them loosen up a bit; especially those kids who think they can’t create art. Everyone can create art. Everyone. A great exercise to get the kids started, I feel. I already had the grid with me from Sara’s workshop, but I redrew it to make it bigger and pasted the same on a blue paper to fit the theme. If you like the idea of practising art with this tool, there are many available here for a little fee. I also printed a Marc Chagall postcard to give the children some kind of a reference (especially those who weren’t aware of his work) before they began working on their masterpieces. White drawing paper stuck on blue cardstock, pencils, colours, die and the grid to play is all you need for this activity.
After these “art icebreakers” we jumped into some seriously arty and seriously fun stuff.
Find the missing painting.
This was truly the highlight of our morning, a game where the kids had to find a painting that had gone missing from our “art gallery”. The game consisted of four tasks (centered around art, ofcourse). Each task came with a list of instructions and upon completing one task, the clue to where the instructions for the next task were revealed and so and so forth. The final task led them to the “missing painting”. I had an absolute blast planning and creating this.
The first task: Who has “___”?
I created a set of twenty question cards and twenty answer (art) cards. (Unknown to the kids, each of the art cards also had an alphabet stamped on the reverse side and when put in a predetermined order, it revealed the location of where they would find the next clue).
The cards with the art on them were distributed equally amongst all the children. I then placed the first question card on the table. Next, everyone looked at their cards to see if they had the answer to it. The child who had the corresponding art card (answer to the question) then showed it to the whole group so they could discuss if it seemed like the correct answer and then put the art card (face down) under the question card. The game continued till the very last question had been answered. Ofcourse, there were some kids who needed a bit of help but since this was more of a collaborative activity where they shared why they thought their card fit a particular question, it worked out all fine. Help was encouraged!
Since all the art cards were now face down, the alphabets that I had stamped on each one could be seen and together they revealed the location of where they would find their next clue (the next task).
The kids loved the miniature “paintings” and I loved hearing them discuss and decide. It was my little way to revisit some terms they were familiar with and expose them to some new ones through this game.
The second task: Solve the crossword.
Here, the children had to solve a crossword based on names of famous artists with the help of clues. I made sure to include some names, that the children were familiar with (had studied at school and some common names) and some that were new to them. Sara likes reading about different artists and their lives so she was a big help and together they could solve it within the stipulated time.
The idea behind this game was to expose them to different artists and their painting styles. Imagine, if even one child went home learning one new name that day and asked their mum dad about her/him, doesn’t that make you giddy with excitement? At this point, I must admit I always like to hide a little bit of learning when having fun and I was a tad bit worried if the children and my own child would hate me after the party. My child still loves me and the others went back happy (or so she and they say), so win-win!
The conditions for each stage were that you had to both complete the task and figure out the clue that led them to the next stage. One without the other and you won’t move closer to the missing painting. In the crossword, if you notice, there are some boxes that have been marked blue. Rearranging the alphabets in those blue boxes, revealed the location for the next clue.
The third task: Solve the secret code.
Who doesn’t like solving secret codes? I remember my sister and I having a secret code language of ours that many years later I taught Sara too! For this task, each child was given a quote by a famous artist but in the form of a code. They were also given the key to solve it. Within a stipulated time, they had to decipher all of them and share it with the rest of the group. Some of the highlighted alphabets revealed the location of the last task/clue.
Hopefully, inspiring words from famous artists encouraged the children to embrace creativity in a form that they will enjoy.
The last and final task: Elements & Principles of Design
I just can’t help myself when I am amidst a group of young minds. Be it to do with some kind of food education or art education in this case. They don’t need to know they are learning, right, they are simply having some fun?! This task was based on the elements of designs (the tools to make art) and the principles of design (how to use those tools to make art).
The children got two baskets, each containing several items. They had to together, match the items of the first basket to the “elements of design” and the contents of the second basket to the “principles of design”.
There was a lot of discussion and going back and forth and excitement when “playing” this game. Let’s see, if you can match them too! As always I was there to lead them if they were stuck.
Now, that we had completed all the four tasks and understood a lot about art, artists, creativity and design, the kids were given a list of questions to figure out which painting was missing from the art gallery. The questions were all centered around Van Gogh (one of Sara’s favourite artist, though she says it’s really tough to choose because she loves Frida and Monet, equally) and her favourite piece of art painted by him. No, it’s not famous “The Starry Night” but for some reason it’s the slightly less well known, the “Bedroom in Arle”. She can’t explain why but she is drawn to it like a magnet.
There were screams of joy on solving the “case” and the children were rewarded with their own “Bedroom in Arle” picture postcards.
The last activity that we did that day was inspired by Picasso’s art. Picasso often created human faces with different elements of the faces, rendered from various points of view, all in the same painting. I came across these faces and we used to them as a starting point to create (though the kids were free to make their own sketches) our very own Picasso inspired art on “frames” using features that I cut from several magazines and newspapers. The kids got a chance to appreciate his method of creating these faces (with a good laugh because they did come up with really funny ones) and while they were busy mixing the features and pasting eyes and ears and mouth and lips, I used those ten minutes to reheat and lay the brunch table (because this activity didn’t require any adult supervision, I intentionally kept it right at the end). I loved how some of them got really creative and added sunglasses on eyes, flowers on heads and made different hairstyles.
Everyone was hungry and wanted CAKE.
For her birthday brunch, we kept the menu really simple. Simple but all things that children love. Homemade waffles with chocolate sauce, maple syrup and strawberries, a tray of roast potatoes with oregano and lemon, strawberry yoghurt and granola parfaits, buttered corn, lemonade, orange juice and kiwi lime.
And cookies. Every year on her birthday, I make cookies. At first, I made them because it fit in with the menu and now it’s something that I just do because everyone and I mean everyone tells me “ we have to have them” because a birthday isn’t complete without some cookies (and cake…which I will share in just a bit).
So we had these “watercolour” painted cookies to match the theme.
What is teal and other shades of blue (with hints of yellow), white on the outside and chocolatey on the inside, filled with berries, intentionally messy so you can get away with decorating it in any which way you like and still end up with an edible “masterpiece”. Her art theme birthday cake. I am no icing cake kind of cake person but birthdays and special occasions are when I go all out. Having said that, when it’s a stress free kind of an icing with textures (love them!) and in this case made using the artist’s palette knife, that can turn a simple cake into a sort of “work of art”; it’s a win-win in my little world. It was a lot of fun playing with colours and painting it.
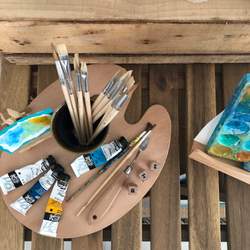
After spending an art and creativity filled morning, we thanked our little guests for making Sara’s tenth birthday so special and memorable. This wooden artist’s palette and a set of paint brushes along with all of the other stuff they made and won (Frida inspired headband, Chagall inspired painting, Picasso inspired portraits and Van Gogh’s Bedroom at Arle postcard) went home with them.
Gustav Klimt once said, art is line around your thoughts. So draw that line, make a point, take a stand and take a risk. I’ll leave you with these thoughts then…imagine, dream and create. And have no fear of perfection.
A very Happy Birthday to my young artist, once again. Life is a great big canvas, throw all the paint you can at it.
Party Highlights
-
What People Ate
For her birthday brunch, we kept the menu really simple. Simple but all the things that children love. Homemade waffles with chocolate sauce, maple syrup and strawberries, a tray of roast potatoes with oregano and lemon, strawberry yoghurt and granola parfaits, buttered corn.
-
What People Drank
Lemonade, orange juice and kiwi lime.
-
Desserts
We also had watercolour cookies and an art-inspired cake.
-
Party Favors
After spending an art and creativity filled morning, we thanked our little guests for making Sara’s tenth birthday so special and memorable. This wooden artist’s palette and a set of paintbrushes along with all of the other stuff they made and won (Frida inspired headband, Chagall inspired painting, Picasso inspired portraits and Van Gogh’s Bedroom at Arle postcard) went home with them.
-
Activities / Games
We had a mix of activities all inspired by some of Sara’ favourite artists and the principles of art in general. We began the day by making Frida inspired headbands. Frida is one of Sara’s favourite artist and she is always trying to master her portraits and read as much as possible on her (The book “Lucky Broken Girl”, though is not about Frida but the protagonist’s life is much like Frida’s and Sara loves that book). Frida loved wearing flowers and we made ours using several delicate white cupcake liners. 6 cupcake liners per flower, ribbon for the band, stapler pins and glue was all that we needed to make it. Some of them even turned them into brooches for their mums and some wore them around their neck like a collar. Next up, was an activity that Sara had once done at an art camp and had enjoyed immensely. Roll a “name of the artist”. We “Rolled a Marc Chagall”. The game is really simple; the kids roll the die and follow the instructions against each number. It allows kids to appreciate and notice some of the elements that a particular artist used more of, in her/his art. It also allows them to get over the fear of spoiling a pristine white page without being too hard on themselves (making it time bound, no erasing allowed and the prompts, all helps in reducing the fear of being perfect) and that kind of also helps them loosen up a bit; especially those kids who think they can’t create art. Everyone can create art. Everyone. A great exercise to get the kids started, I feel. I already had the grid with me from Sara’s workshop, but I redrew it to make it bigger and pasted the same on a blue paper to fit the theme. If you like the idea of practising art with this tool, there are many available here for a little fee. I also printed a Marc Chagall postcard to give the children some kind of a reference (especially those who weren’t aware of his work) before they began working on their masterpieces. White drawing paper stuck on blue cardstock, pencils, colours, die and the grid to play is all you need for this activity. After these “art icebreakers” we jumped into some seriously arty and seriously fun stuff. Find the missing painting. This was truly the highlight of our morning, a game where the kids had to find a painting that had gone missing from our “art gallery”. The game consisted of four tasks (centered around art, ofcourse). Each task came with a list of instructions and upon completing one task, the clue to where the instructions for the next task were revealed and so and so forth. The final task led them to the “missing painting”. I had an absolute blast planning and creating this. The first task: Who has “___”? I created a set of twenty question cards and twenty answer (art) cards. (Unknown to the kids, each of the art cards also had an alphabet stamped on the reverse side and when put in a predetermined order, it revealed the location of where they would find the next clue). The cards with the art on them were distributed equally amongst all the children. I then placed the first question card on the table. Next, everyone looked at their cards to see if they had the answer to it. The child who had the corresponding art card (answer to the question) then showed it to the whole group so they could discuss if it seemed like the correct answer and then put the art card (face down) under the question card. The game continued till the very last question had been answered. Ofcourse, there were some kids who needed a bit of help but since this was more of a collaborative activity where they shared why they thought their card fit a particular question, it worked out all fine. Help was encouraged! Since all the art cards were now face down, the alphabets that I had stamped on each one could be seen and together they revealed the location of where they would find their next clue (the next task). The kids loved the miniature “paintings” and I loved hearing them discuss and decide. It was my little way to revisit some terms they were familiar with and expose them to some new ones through this game. The second task: Solve the crossword. Here, the children had to solve a crossword based on names of famous artists with the help of clues. I made sure to include some names, that the children were familiar with (had studied at school and some common names) and some that were new to them. Sara likes reading about different artists and their lives so she was a big help and together they could solve it within the stipulated time. The idea behind this game was to expose them to different artists and their painting styles. Imagine, if even one child went home learning one new name that day and asked their mum dad about her/him, doesn’t that make you giddy with excitement? At this point, I must admit I always like to hide a little bit of learning when having fun and I was a tad bit worried if the children and my own child would hate me after the party. My child still loves me and the others went back happy (or so she and they say), so win-win! The conditions for each stage were that you had to both complete the task and figure out the clue that led them to the next stage. One without the other and you won’t move closer to the missing painting. In the crossword, if you notice, there are some boxes that have been marked blue. Rearranging the alphabets in those blue boxes, revealed the location for the next clue. The third task: Solve the secret code. Who doesn’t like solving secret codes? I remember my sister and I having a secret code language of ours that many years later I taught Sara too! For this task, each child was given a quote by a famous artist but in the form of a code. They were also given the key to solve it. Within a stipulated time, they had to decipher all of them and share it with the rest of the group. Some of the highlighted alphabets revealed the location of the last task/clue. Hopefully, inspiring words from famous artists encouraged the children to embrace creativity in a form that they will enjoy. The last and final task: Elements & Principles of Design I just can’t help myself when I am amidst a group of young minds. Be it to do with some kind of food education or art education in this case. They don’t need to know they are learning, right, they are simply having some fun?! This task was based on the elements of designs (the tools to make art) and the principles of design (how to use those tools to make art). The children got two baskets, each containing several items. They had to together, match the items of the first basket to the “elements of design” and the contents of the second basket to the “principles of design”. There was a lot of discussion and going back and forth and excitement when “playing” this game. Let’s see, if you can match them too! As always I was there to lead them if they were stuck. Now, that we had completed all the four tasks and understood a lot about art, artists, creativity and design, the kids were given a list of questions to figure out which painting was missing from the art gallery. The questions were all centered around Van Gogh (one of Sara’s favourite artist, though she says it’s really tough to choose because she loves Frida and Monet, equally) and her favourite piece of art painted by him. No, it’s not famous “The Starry Night” but for some reason it’s the slightly less well known, the “Bedroom in Arle”. She can’t explain why but she is drawn to it like a magnet. There were screams of joy on solving the “case” and the children were rewarded with their own “Bedroom in Arle” picture postcards. The last activity that we did that day was inspired by Picasso’s art. Picasso often created human faces with different elements of the faces, rendered from various points of view, all in the same painting. I came across these faces and we used to them as a starting point to create (though the kids were free to make their own sketches) our very own Picasso inspired art on “frames” using features that I cut from several magazines and newspapers. The kids got a chance to appreciate his method of creating these faces (with a good laugh because they did come up with really funny ones) and while they were busy mixing the features and pasting eyes and ears and mouth and lips, I used those ten minutes to reheat and lay the brunch table (because this activity didn’t require any adult supervision, I intentionally kept it right at the end). I loved how some of them got really creative and added sunglasses on eyes, flowers on heads and made different hairstyles.
add your comment
To leave a comment Log in -or- Join the party